ONE PROBLEM BEING ADDRESSED –H2O SCALE August 21, 2022
Posted by rik94566 in agponics.com, aquaponic devices, aquaponic issues, aquaponic systems, aquaponics, auqaponics automation, DIY aquaponics.Tags: aquaponic water issues, aquaponics, DIY aquaponics, indoor aquaponics, rik kretzinger, water quality
add a comment

As the water situation becomes much more extreme in Northern California water quality changes depending upon the source of water supply. Water hardness has changed many, many times over the last 5 years and I have had to be more careful with pH and hardness when doing water changes or water additions in the fish tanks and monitoring much more and I still end up with this. So I have now developed a plan on what needs to take place and starting to put the plan into action and will be talking about the efforts now as well as other interesting things I am tracking and working at getting put into place in my grow area. Once I have cleaned up the scale issues I can move on to misting systems and use of some more advanced technology to get me to the next level in my efforts.
TIME TO STEP UP TO A BETTER TESTER March 21, 2021
Posted by rik94566 in aquaponic systems, aquaponics, Controlled Environment Agriculture, DIY aquaponics, general, Internet-of-Farming, IoT aquaponics, pH, rik kretzinger, rik.diy.IOT, rik94566.Tags: aquaponics, Bluelab, pH, rik-dyi-IOT, rik94566, tester
add a comment

For about 3 years I have been using a cheap pH tester. The main reason for using cheap units has been that I did not know the type and configuration that I wanted to purchase for the main unit that I would be using for many years to come. After the purchase of another testing probe made by Bluelab I started researching the pH options the Bluelab offered. As I found many different units that could be purchased for this purpose. So after some time and reading many reviews I selected the pH-PEN. Life has gotten much simpler with this purchase. More expensive YES – but I now save so much time as the calibration holds for a month and is very accurate every time I use the unit. So happy I selected this unit of very high quality and perfect for all my needs. I purchased the unit from Amazon.
HOME ASSISTANT — NODE-RED August 31, 2020
Posted by rik94566 in agponics.com, aquaponic automation, aquaponic systems, aquaponics, auqaponics automation, Controlled Environment Agriculture, DIY aquaponics, indoor aquaponics, internet of farming, Internet-of-Farming, Uncategorized.Tags: aquaponic automation, aquaponic devices, Home Assistant, Internet-of-Farming, Node-Red, rik kretzinger, rik-dyi-IOT, rik94566
add a comment
Researching how best to start learning Node-Red I spent a lot of time on YouTube watching what Node-Red is and how people learned how to use it. As always a lot of YouTuber’s put out content and some are clearly better at actually helping people understand concepts and produce valuable content that can be put to use by a non-computer programmer type person.
So I developed my list of people that were best for me to follow and start the process of learning this new skill set. Many of the ones I like were talking about the use of Node-Red with Home Assistant.
I had looked at Home Assistant some years ago and at the time it seemed Home Assistant was for very advanced users that are very good at the command prompt and with a lot of system knowledge. Way above my level at the time.
Then my research turned up this reference and changed my perspective on using Home Assistant.
This was, just what I was looking for.
STARTED YEAR WITH NEW GOAL August 28, 2020
Posted by rik94566 in Node-Red, Uncategorized.Tags: aquaponic devices, aquaponic electronics, aquaponics, Node-Red, rik-dyi-IOT, rik94566
add a comment
In an effort to be able to develop faster I set a goal to go in a different direction. My choices were learn to program in python or explore and work with Node-Red.

Being that I have no programing background or real understanding of computer science python was going to be a major effort to learn and a large time commitment which would take away from my other efforts. After a little more research Node-Red seemed the better choice since both options were going to be a lot of work on my part.
Learning Node-Red and getting start with it was my new goal for the year.
DS18B20 – Resistor Module – parts defined November 4, 2019
Posted by rik94566 in 1-wire, agponics.com, aquaponic devices, aquaponics electronics, auqaponics automation, DIY aquaponics, DS18B20, ds18b20, Electronic Componets, indoor aquaponics, internet of farming, Internet-of-Farming, IoT aquaponics, One-wire, rik kretzinger, rik.diy.IOT, rik94566.Tags: aquaponic automation, aquaponic devices, aquaponic electronics, aquaponic sensors, aquaponics, DS18B20, DS18B20 aquaponics, ds18b20 water proof, Internet-of-Farming, rik, rik-dyi-IOT, rik94566, sensors
6 comments
Working with the resistor module is making things much easier and a lot less work on my part. I am liking what I am seeing from a development standpoint and can see a real time savings that will deliver consistent results. First step is understanding what is found on the board and which end goes with which connection.

Been looking for a better way – DS18B20 October 15, 2019
Posted by rik94566 in 1-wire, agponics.com, aquaponic devices, aquaponics electronics, arduino, auqaponics automation, Balcony aquaponics, Balcony Garden, Controlled Environment Agriculture, DIY aquaponics, DS18B20, ds18b20, Electronic Componets, internet of farming, Internet-of-Farming, IoT aquaponics, rik kretzinger, rik.diy.IOT, rik94566, sensor, Stainless Steel Temp Probe, Temperature Probe.Tags: agponics, aquaponics, DIY aquaponics, DS18B20, DS18B20 aquaponics, Internet-of-Farming, rik, rik94566, sensor
3 comments
I was doing some research on a totally different subject and this popped up.

Why this one?
Well easy answer – I have been making my own 4.7 pull-up resistor connectors for sometime now. Problem for me is that they take a lot of time and are very bulky and hard to work with. For a little more cost a dollar or so I get a board that will allow easy connections to many (so I think) DS18B20 sensors using one resistor. The order came and now I can start testing my idea. Having a solution this turn key will save a lot of time and perform better, time will tell now.
I will be posting how the testing goes and what will be needed to get top performance out of this module.
Miniature Test Leads – which ones work best for my projects July 20, 2019
Posted by rik94566 in adafruit, agponics.com, aquaponic automation, aquaponic systems, DIY aquaponics, indoor aquaponics, Instructables, internet of farming, Internet-of-Farming, IoT aquaponics, rik kretzinger, rik.diy.IOT, rik94566.Tags: aquapnic devices, aquaponic system parts, aquaponics, DIY aquaponics, Internet-of-Farming, jameco electronics, rik, rik94566, sensor
add a comment
I wanted to move away from alligator clips because they were much large when working with small gauge wire. They did not work for me in very small areas. So was looking for a better solution. Found this miniature test leads at Jameco Electronics when I was picking up an order, they were a good solution for me.

When first using these miniature test leads they worked very well. But after a little time using these leads and problems surfaced. The problem was that they were cheaply made. The connection of the wire and the metal insert probe would break off without much stress placed on them. One or two is understandable, but 5 out of 10 was not the experience I was looking for.
When doing a search for a new product on the Adafruit site I found these test leads
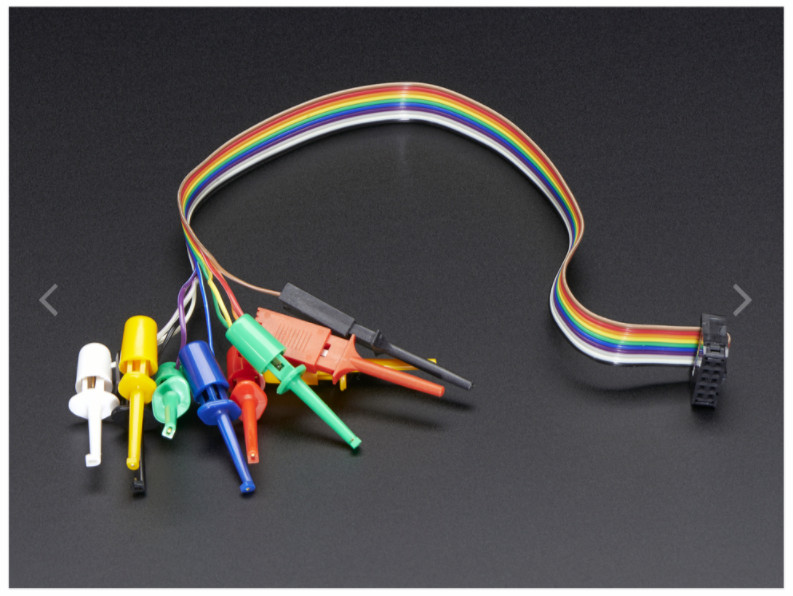
These leads are a little larger than the Jameco test leads, but still were small enough for my use. Construction and connections were of high quality and work perfectly and held up with repeated use. So these are my new go to test leads for my development efforts. They will be seen in a number of up coming Instructables that I am working on and all my testing of sensors and connectors.
Started a new YOU TUBE channel — rik.dyi.IOT July 13, 2019
Posted by rik94566 in agponics.com, aquaponic automation, aquaponics, aquaponics electronics, arduino, auqaponics automation, Balcony aquaponics, Balcony Garden, BSF - Black Solider Fly.1 comment so far
Be a maker – change your world
Being that I have been working on a lot of content in a number of different areas over the past two years, I need a better brand than what I had been using (which was really nothing). So, to support this effort I decided to re-brand with a new logo and more descriptive caption as to my actual efforts and interests. My focus has not changed over all and still is AQUAPONICS, but there are so many other areas that impact the full scope of Aquaponics in todays world. Aquaponics is no longer just about PLANTS – FISH – WATER which is being shared — in my mind.
Here is the link to my new YOU TUBE channel and I will be building it out as I finish off content that supports my AQUAPONICS efforts to expand my development of some RADICAL new concepts that I have been thinking about and working on deployment of.
https://www.youtube.com/channel/UCcsDV2kS2vE_snRF5OlKL_A
![]()
WATER LEVEL INDICATOR – AQUAPONICS quest for a useful one September 13, 2018
Posted by rik94566 in adafruit, aquaponic automation, aquaponics, Balcony Garden, DIY aquaponics, Instructables, internet of farming, IoT aquaponics, rik kretzinger, rik94566, sensor, Uncategorized.Tags: aquaponics, DIY aquaponics, rik, ultrasonic sensor
2 comments
THE PROBLEM IN AQUAPONICS for me —
Up to this point I have wanted to have a simple, but effective water level indicator sensor for the water level in the Balcony Garden fish tank component of the build – that works!
Aquaponic Sensor Set for Balcony Garden — see section on ultrasonic sensor
I spent a lot of time working with and trying to stabilize a ultrasonic solution.
First off these sensors are not waterproof ( the waterproof version is around $85.00 US Waterproof version). The non-waterproof versions run around $5.00 US. So this would seem the best way to go and work to make it work by using some waterproofing strategies. Hard to do when working in an aquaponic environment.
Next they are very hard to mount in a way that they can be useful to determining water level in a tank. There are a lot of instructables talking about this aspect for these sensors and even more youtube articles, but most if not all are just demos and breadboard applications. No real useful solutions that really can be implemented in a scalable way.
Final issue is that I have yet to be able to stabilize these sensors and have wasted a lot of time trying to get them to be reliable in a usable way.
SOLUTION – find a better method or be able to purchase one that actually gets the job done in a simple and affordable and scalable way.

Arduino IDE running on RPi using 5″ HDMI 800 X 480 display March 30, 2017
Posted by rik94566 in 800 X 480 display, adafruit, agponics.com, arduino, DIY aquaponics, Instructables, IoT aquaponics, Raspberry PI, rik kretzinger, rik94566, Uncategorized.Tags: 800X480 display, arduino, arduino IDE, rik, rik94566
add a comment
Since the problem with using a 5″ HDMI display was worked with the Raspberry Pi. A new problem developed that needed to be addressed. Running Arduino IDE on Raspberry Pi using the 5″ HDMI display at 800 X 480 resolution. The problem is that the Arduino IDE bleeds off the edges of the display (see picture below). The issue is that the Arduino IDE cannot be moved around to get access to the menu options. So there is no way to check libraries or setting to insure sketches are being up-loaded correctly. No new sketches can be opened either. Major pain.

After some research and a little time solving the Raspberry Pi – Jessie with Pixel display issue I found a solution that resolves this issue as well.
I wrote an Instructable to document what is needed, so check it out if this is a issue for you.
Window size issue with Arduino IDE and RPi
Here are the results:

