Asparagus – new crop for this year February 23, 2013
Posted by rik94566 in agponics.com, aquaponics, asparagus, DIY aquaponics, Yield Results.Tags: aqauponic asparagus, aquaponic automation, asparagus aquaponics, DIY aquaponics, rik kretzinger
4 comments
I wanted to try a new crop this year. So I did some research for my area and picked a crop that I had some interest in for quite some time, but had no idea how to grow it. Then to try and grow it using aquaponic method is really out there as a concept. Doing a internet search there is very little to no information on the subject of growing asparagus in an aquaponics system.
So here we go with my first attempt at growing Asparagus in my 100 gallon unit.
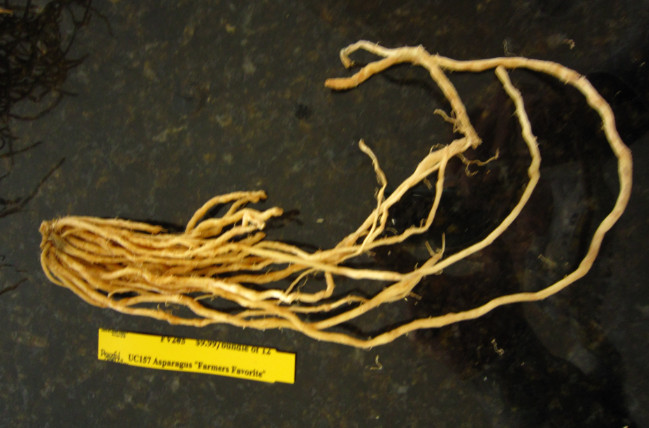
Asparagus Start
I placed an order for my starts in early October so I was assured of getting my plant material by Mid-January. I had no idea of what the weather would be like in Mid-January, but I took my changes on getting the starts. There was a chance that if I ordered to close to the actual shipping time from the company I would not get the plant starts I needed to launch this new growing adventure, as the company does run out of asparagus early in the season.
The next big issue was how should I plant them in my grow beds. I learned that asparagus is planted 12 to 15 inches below ground in late January to early spring, so my timing was good but needed to empty my aquatubes to be enough depth for the starts. Once the grow tubes were empty I covered the bottom of the grow bed with enough gravel to make sure the starts would not be sitting in standing water when the grow beds drain after each watering cycle. This is because to fully drain out of my grow beds there is always some water that sits at the bottom of the grow beds and will drain out over longer period of time.

Placement on gravel

Spaced out in growbed
Once I had all my starts place in the grow beds I covered them in gravel up to the crowns. Then I put a very thin layer of gravel over the crowns.

Gravel up to crowns
In my research I found that when planting asparagus – you place the starts and cover them lightly and once they start and throw shoots you cover them a little bit, just enough to support the sprouts until they reach ground level or in my case the top of my gravel beds.
Next was to give them some water so I could bring the starts out of dormancy. I did not want to over water them and cause disease problems so I watered them once ever other day. Temperatures had been down in the low 30’s with day time temps only getting up high 40’s.
After one week I had my first shoots.
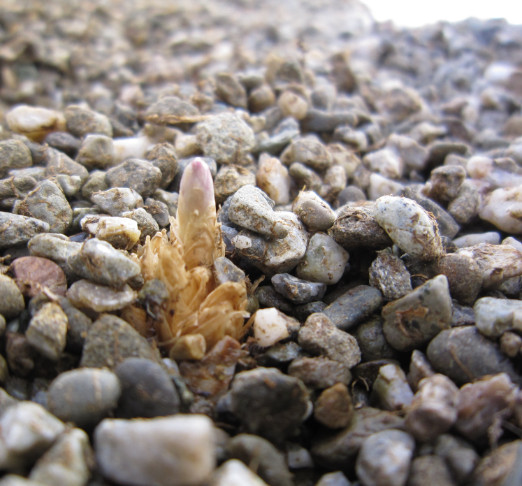
First Shoot
10,000 views surpassed on Instructables June 11, 2011
Posted by rik94566 in aquaponic automation, aquaponics, arduino, CAT 5 Cable, Crop, DIY aquaponics, DS18B20, Float Sensor, Float Switch, general, Glow Panel 45, Gravity feed valves, Hacks, indoor aquaponics, indoor gardens, indoor growing, Instructables, LED growing, LED lights, plumbing, POW-Rduino, Rj45 connector, sensor, Sensor Hub, Stainless Steel Temp Probe, Standards, sunshine systems, Suppliers, Temperature Probe, Yield Results.Tags: aquaponic automation, aquaponics, arduino, arduino sketch, CAT 5 cable, DIY aquaponics, DS18B20, electronics, float sensor, hacks, indoor aquaponics, indoors aquaponics, microcontroller, rik kretzinger, sensor, Temp Probe, Temperature Probe
1 comment so far
I have written 3 instructables over the last 2 years. I have just gone over 10,000 views. Never thought I would every have had that many views with only 3 instructions. Always good to know people are interested in what I am interested in.

Passed 10,000 views
Red Cabbage — aquaponics May 28, 2011
Posted by rik94566 in aquaponic automation, aquaponics, Crop, DIY aquaponics, Red Cabbage, Yield Results.Tags: aquaponic automation, aquaponics, crop, DIY aquaponics, microcontroller, red cabbage, rik kretzinger, yield results
add a comment
I have been making a lot of progress on my quest to master understanding the DS18B20 temperature probes for use in my aquaponic units that I build. But I need to keep in mind where all this is leading. So here are some pictures of

5 weeks of growth
my first attempt at growing red cabbage in my current working unit. I only have one tube functional at the this time, as I am working on a redesign of my upper tube to incorporate my work on the temp probes and media probes for the next step in my Smart Tube automation.

Close up of one plant at 5 weeks
The leaves on my plants are huge!!

White square is 1" X 1"
Here is my growth at 9 week mark heads are starting to form. I am weeks away from “RED CABBAGE” coleslaw.

9 weeks of growth
To give some idea of how big these things are, the back tube is 15″ in diameter and tube growing the cabbage is 12″ PVC pipe.

Heads starting to take shape
Sugar Pea Harvest June 28, 2010
Posted by rik94566 in aquaponics, Crop, Sugar Peas, Yield Results.Tags: aquaponics, crop, rik kretzinger, sugar peas, yield results
2 comments

Last pick of season
These are the last Sugar Peas of this season. Now its time to determine how productive my 3.5 square feet of grow space was. At the end of 90 days of growth on Oregon Sugar variety. Harvest was a total of 5 pounds of peas. I had no idea if this was a good number or how it related to normal ag production, so I researched sugar pea yields to determine how productive my 3.5 square feet of grow area. This research took me to the link listed below:
http://ucanr.org/freepubs/docs/7233.pdf
Edible-Pod Pea Production in California.
I learned from this publication that average Edible-Pod Peas get 25,000 plants per acre with 2.6 tons (5200 pounds) of edible pods. I visited Whole Foods and determined the market price for edible pods was $5.00 per pound or equal to $26,000.00 per acre. On a per square foot figure this works out to be .5 plants and $0.59 per square foot.
Now that I have a starting point on average production figures I can work out how my yield per square foot matched up with California average yield.
Taking my 5 pounds of production in 3.5 square feet I produced 1.42 pounds per square feet. My number of plants per square feet was 8.
Before I work out the comparison of my yield and the average production per acre it would be good to view the growth I got from my plants. The variety I grew was listed to grow 60 to 72 inches. I got 108 inches (9 feet) would have been more, but a late season rain storm can through Northern California in late May and broke the top growth off 5 of my plants.

Sugar Pea Height
Production in my 3.5 square feet of grow area would have been much greater had I had my upper level of the sugar peas tied back. A lesson learned and I will make sure to keep up with the growth.
COMPARISON OF YIELD: (on a per acre basis)
Aquaponic unit vs California Edible-Pod Pea average yield
Plants per acre — 95,8 32 25,000
Tons per acre — 31.0 2.62
Gross Value — $309,276.00 $26,000.00
The gross value is determined by using a $5.00 per pound price found at Whole Foods in San Ramon, California.
Additional pictures of Sugar Pea Pods:

Close-up of Sugar Peas growth

Different View of Plants
