Arduino IDE running on RPi using 5″ HDMI 800 X 480 display March 30, 2017
Posted by rik94566 in 800 X 480 display, adafruit, agponics.com, arduino, DIY aquaponics, Instructables, IoT aquaponics, Raspberry PI, rik kretzinger, rik94566, Uncategorized.Tags: 800X480 display, arduino, arduino IDE, rik, rik94566
add a comment
Since the problem with using a 5″ HDMI display was worked with the Raspberry Pi. A new problem developed that needed to be addressed. Running Arduino IDE on Raspberry Pi using the 5″ HDMI display at 800 X 480 resolution. The problem is that the Arduino IDE bleeds off the edges of the display (see picture below). The issue is that the Arduino IDE cannot be moved around to get access to the menu options. So there is no way to check libraries or setting to insure sketches are being up-loaded correctly. No new sketches can be opened either. Major pain.
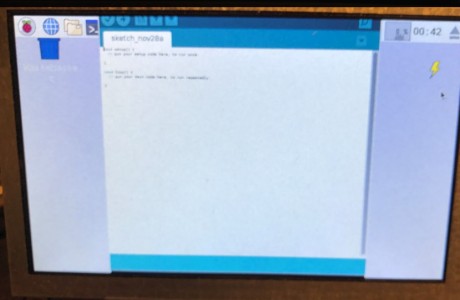
After some research and a little time solving the Raspberry Pi – Jessie with Pixel display issue I found a solution that resolves this issue as well.
I wrote an Instructable to document what is needed, so check it out if this is a issue for you.
Window size issue with Arduino IDE and RPi
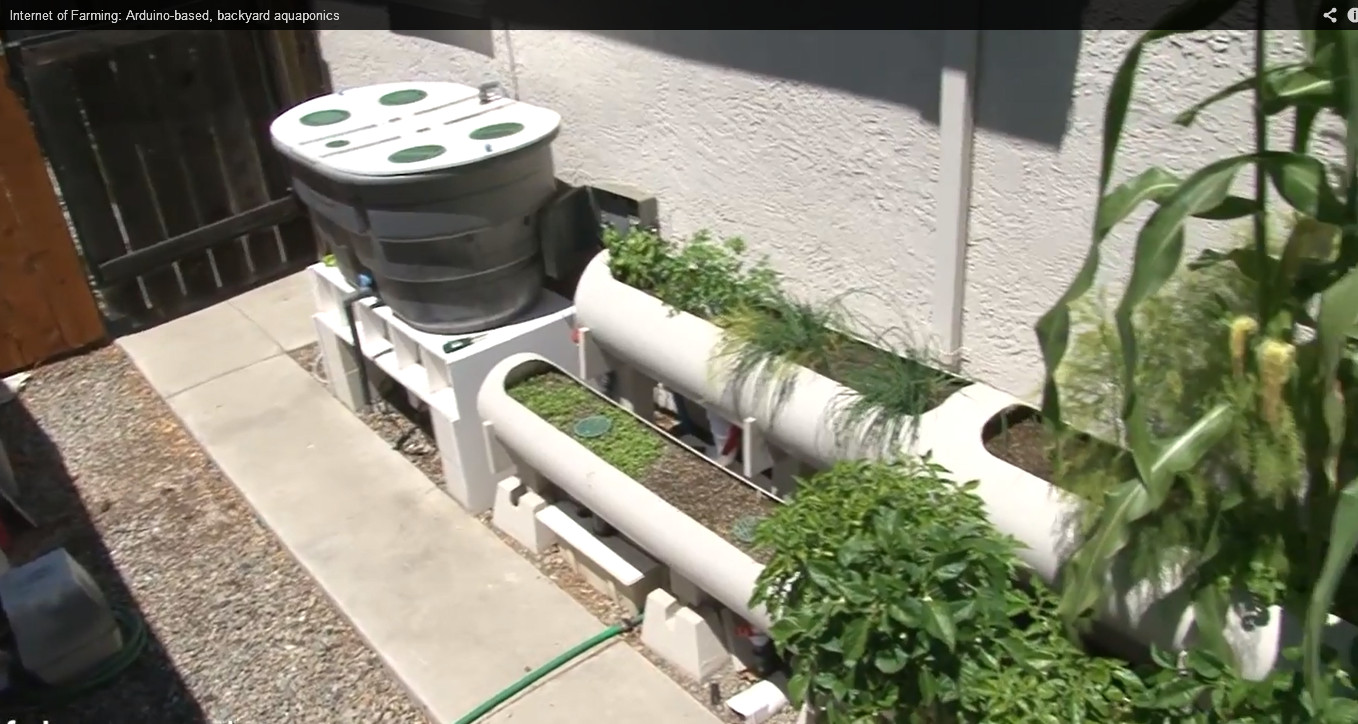
Here are the results:

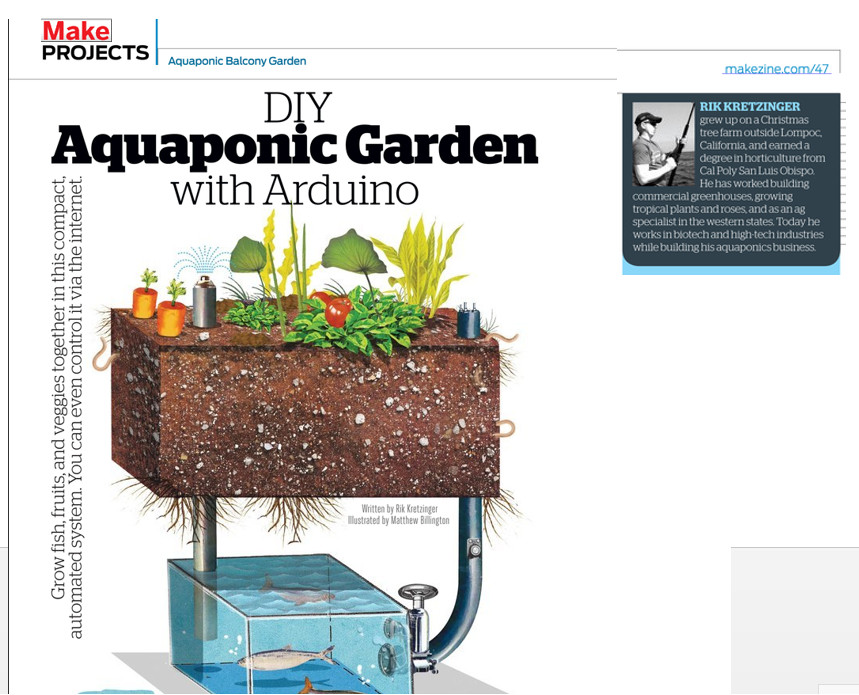
BALCONY GARDEN – diy aquaponic system — Published in MAKE MAGAZINE this issue September 21, 2015
Posted by rik94566 in auqaponics automation, Balcony Garden, DIY aquaponics, internet of farming, rik94566.Tags: aquaponics, arduino, DIY aquaponics, make magazine, rik, rik kretzinger
3 comments
First article published in Make Magazine vol. 47
DIY aquaponic Balcony Garden — my copy came today!
Make sure and read it!
Technology is complicated — May 8, 2015
Posted by rik94566 in Controlled Environment Agriculture, DIY aquaponics, Electronic Componets, indoor aquaponics, IoT aquaponics, Temperature Probe.Tags: agponics, aquaponic automation, aquaponics, arduino, arduino sketch, automation, DIY aquaponics, indoors aquaponics, microcontroller, rik kretzinger, Temboo, YUN
add a comment
I say this because I will be displaying my aquaponic – IoT – Balcony Unit at Maker Faire next week in San Mateo. To accomplish the IoT part of the build I have to use technology that allows for internet communication thus IoT! Well there are many options available to accomplish this task – some not so easy and others not enough features to be effective for this project.
So my choice in this case is the Arduino YUN —

I made this choice because I had one (but had not used it as yet) and the fact that documentation on it is easy to find. The other fact is that Temboo www.temboo.com uses the YUN as one of its options for their solution to the Internet of Things and I am working with them on this open source project so many others will be able to get up and running in short order and have simpler options to add additional capability based on the persons needs and I will not have to supply the customer support for any aspect of the code other than give everyone a stating point.
WELL – that is where things got interesting.
Had to work through getting the YUN on the network of choice. Not a big deal but it took some time and many attempts to get it dialed in because the Arduino instructions tell you to go to arduino.local to find the individual unit. Well this only works about 60% of the time. So the solution is to use the IP address of 192.168.24.1 now I could configure the thing to my liking. Once configured it would not show up in the Arduino IDE at all. Major issue for me as I had no idea if the unit configured or not. I finally when on to my wireless router to see if the board was being recognized. Had to dig out all the USER ID and PASSWORD info and then work through all the menus to determine what in fact was connected to the router. There is was — YEA
Now I had to research out why it was not listed as a port option in my Arduino IDE. Well after some time and deep research I found that Arduino IDE only works some times for the YUN on wireless. So the uploading from Arudino IDE to the board is not an option as most of the YouTube videos demonstrate quite well. This becomes an issue because I found out that as configured the YUN does not have enough on board memory, so a SD card is needed.
Using an SD card with the YUN requires that the card be format using the YUN. To do that you need to know that the YUN is connected to the internet and working properly which is very hard to know if it is or not.
So once you know the YUN is connected and you have it connected through cable to your computer you need a file called ” YunDiskSpaceExpander” found on the Arduino site. Once uploaded you access it through the Serial Monitor of the Arduino IDE. If all goes well you answer a bunch of cryptic questions and bingo the thing kicks off. Once do you have a formated YUN SD enabled board.
Now I am ready for the real fun stuff to generate code to be used through Temboo so I will have “Streaming Data” and text messaging in short order – lets hope!
The good news in all of this is that I will be documenting all of this for the instructions to the Balcony unit for all to use and save anyone interested in building one or gets a kit from me that will be up and running in short order.
See you all at Maker Faire next Saturday if you make it there!
aquaponic- IoT device — Balcony Garden March 10, 2015
Posted by rik94566 in aquaponic automation, aquaponics, Balcony aquaponics, Controlled Environment Agriculture, DS18B20.Tags: agponics, aquaponic automation, aquaponics, arduino, automation, balcony aquaponics
add a comment
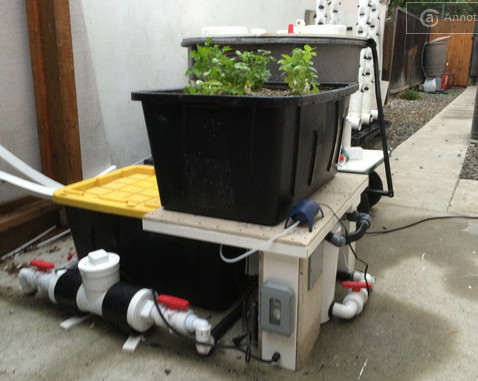
BALCONY AQUAPONIC GARDEN – IoT READY- DIY or purchase materials locally and build — by rik kretzinger


THE BEST OF BOTH WORLDS — arduberry February 12, 2014
Posted by rik94566 in agponics.com, aquaponic automation, aquaponics, aquaponics electronics, arduino, DIY aquaponics, indoor aquaponics, indoor growing, IoT aquaponics, Raspberry PI.Tags: aquaponic automation, arduino, DIY aquaponics, electronics, hacks, indoor aquaponics, indoors aquaponics, IoT, rik kretzinger, sensor
5 comments
I have been reading about this product now for a while and finally thanks to J.C. Naumowicz got the link to check it out.

Here is the link:
https://www.kickstarter.com/projects/john-cole/arduberry-unite-raspberry-pi-and-arduino?ref=email
This solution takes care of a number of issues that are hard to solve with arduino or raspberry pi on there own. The two together are truly better together than as individual solutions.
Enjoy and support this effort if it is something you think will be a better solution for us all.
Major Accomplishments Achieved August 6, 2013
Posted by rik94566 in 1-wire, agponics.com, arduino, Internet-of-Farming, IoT aquaponics.Tags: aquaponic automation, aquaponics, arduino, Controlled Environment Agriculture, DIY aquaponics, IoT, rik kretzinger
4 comments
Well it has been a while since my last post. For good reason. I wanted to hold off posting for some big accomplishments to talk about and set up the direction I will be going with this blog into the future.
FIRST BIG ACHIEVEMENT:
This will be my 100th post. When I started this blog it was more an effort to explore ideas and concepts related to one small aspect of aquaponics and has now grown into a world wide effort from a number of neat people.
SECOND ACHIEVEMENT:
Have had my highest ever number of views on the blog and daily traffic has hit all time highs.

THIRD ACHIEVEMENT:
Will go over 50K view of the Internet-of-Farming this week!
http://www.youtube.com/watch?v=X2wWTadsBDA

LAST MAJOR ACCOMPLISHMENT IS:
Finishing of my agponicMD (micro device). I now have a fully functional aquaponic device that will allow me to test any and all scenarios that I want to. This is a major big deal for me. This allows me to actually achieve IoT on a personal level and be one of the first to reach a practical application that will help interest others in this area of farming and agriculture. Without this blog and the comments from all you I would not have been able to get this far or learned so much.
- Front view of the IoT micro device – shows pump / air stones / pH probe / heater /temp probes / media probes / float switch
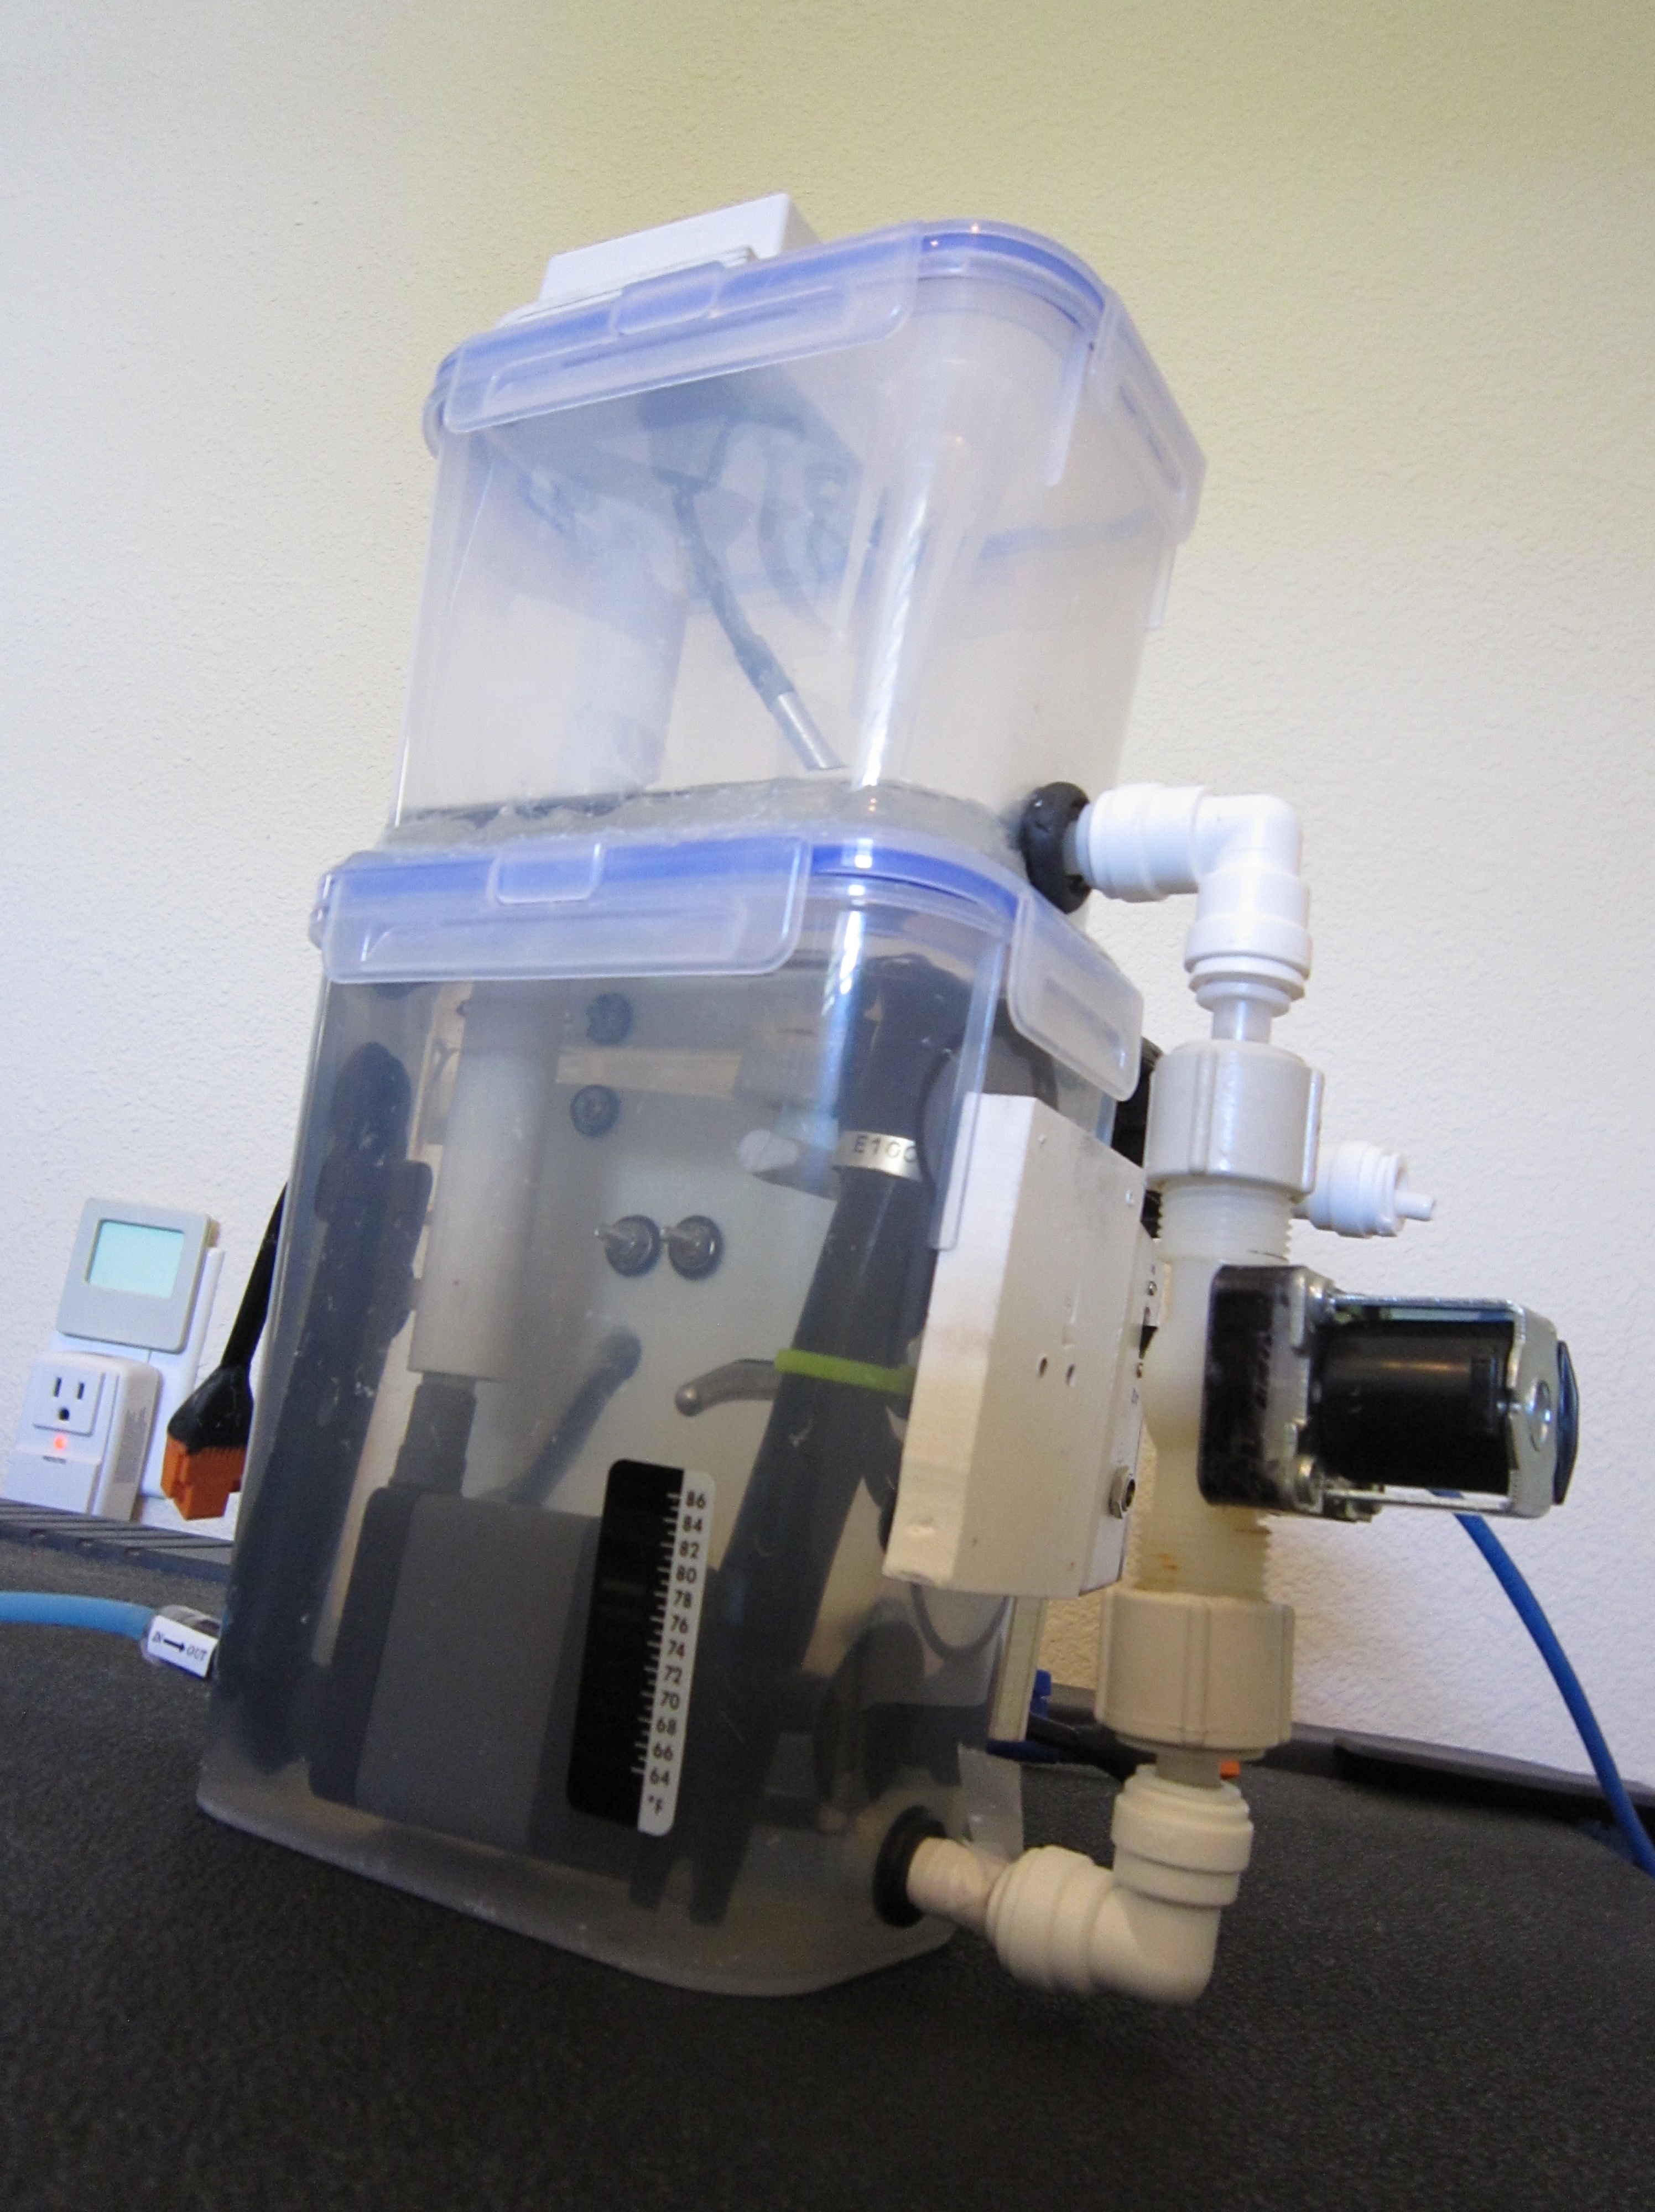

BACKSIDE VIEW
Internet-of-Farming July 5, 2013
Posted by rik94566 in agponics.com, aquaponic automation, aquaponics electronics, arduino, Cilantro, DIY aquaponics, IoT aquaponics.Tags: aquaponic automation, arduino, DIY aquaponics, float sensor, indoor aquaponics, IoT, rik kretzinger, Temperature Probe
15 comments
Just got featured on an international blog showing my aquaponic system and work I have been doing with aquaponic automation in ag related technologies. Getting close to 10,000 views on YouTube.
Slide Switch – making it work for my need April 7, 2013
Posted by rik94566 in agponics.com, aquaponic automation, aquaponics, aquaponics electronics, arduino, DIY aquaponics, Uncategorized.Tags: aquaponic automation, aquaponics, arduino, automation, DIY aquaponics, electronics, rik kretzinger
add a comment
First question is what is a “SLIDE SWITCH”? Well they are very common. Never thought I would need to know how they worked and how I was going to connected them up. As it turns out I have two projects now that require them. So now is the time to work out how to connect them up.
Here is what one looks like. They are found in many electronic devices.

Yet again in electronics you need to know what it is that you want. There is not just on size fits all when it comes to “SLIDE SWITCHES”. I thought this was going to be easy to get connected up.
Here are just a few of the options I had and decisions I had to make on such a small part.
SPDT – Single pole double throw
DPDT – Double pole double throw
SPST – Single pole single throw
SPDT Sub-mini
Heavy Duty Slide Switch
DPDT Right-Angle PCB Mount
These are just the options at Radio Shack. Do an internet search and the options are endless (seems like).
To solve my problem I made a trip to Radio Shack and made a purchase to get started.

Once I got them home I had to deal with picking between the option of 2-3-4-6 prongs to work with. To solve this issue pulled out my multimeter and tested my options.
The end result I was after is to be able to switch between external power and arduino power (parasite power) for my sensors. The reason for this is some times I want to run external power, but when I am only testing a few sensors I just want to keep things simple and run off arduino power.
The end result was use a DPDT Slide Switch. This required to use the 6 prong switch.
DS18B20 — 4.7K connectors completed August 9, 2012
Posted by rik94566 in 1-wire, aquaponic automation, DS18B20, Stainless Steel Temp Probe.Tags: 1-wire, aquaponic automation, arduino, DIY aquaponics, rik kretzinger, sensor, Temp Probe
add a comment

4 – completed connectors and fully tested
The next step to achieving running 20 probes was to complete the 4.7K resistor harness set-up. I now have this done and can move on to the finishing off the ground connector that will allow pull all this together.
AQUAPONICS WORLD WIDE CONFERENCE — Presenter June 30, 2012
Posted by rik94566 in aquaponics, arduino, DIY aquaponics, sensor.Tags: aquaponic automation, aquaponics, arduino, DIY aquaponics, microcontroller, rik kretzinger
9 comments
I learned a few weeks ago that I was selected to present at the World Wide Aquaponics Conference September 21 to 23 of this year. Here are the details if interested:

Aquaponics & Arduino — The WHAT – The HOW — and into the FUTURE – In this workshop attendee’s will gain a understand of the arduino platform and how custom aquaponic automated solutions can be build on any scale.
Workshop OBJECTIVES:
– Know what an arduino is
– Understand the concept of open source
– Touch and feel the sensors that are used in a aquaponic system
– Demystify the use of technology in aquaponics
– Gain understanding of what the future in aquaponics can and will look like
Rik will have a full working desktop unit that is fully automated on a DIY scale. We will breakdown each sensor and explore how they work. We will talk about available resources and see how items purchased on a local level can lead to an automated system that is easy to install at any level. We will have web references and instruction guides on all the major components and how they are connected to form a “SENSOR NETWORK” in today’s world. We will talk about and demonstrate the concept of “INTO THE FUTURE – EVERYTHING WILL HAVE AN IP ADDRESS”
Rik Kretzinger grew up on a Christmas Tree Farm in Central California. He earned a degree in Horticulture from Cal Poly, San Luis Obispo, CA. He worked his way through college as a commercial grower at a major greenhouse operation growing Tropical Plants, and managed over 700,000 square feet of production Roses after graduation. He moved on to fill a Ag Specialist role with Union Carbide working with all the major agriculture crops in the Western States. he is presently working in Biotech industry supporting the growth and development of geneotyping of all major crops throughout the world. Automation in aquaponics started out as a hobby and has now developed in to a full time passion and a clear path to the future of agriculture in the world.
