Connector Box on agponic-MD February 2, 2014
Posted by rik94566 in 1-wire, agponic MD, agponicMD, agponics.com, aquaponic automation, aquaponics, aquaponics electronics, arduino, DIY aquaponics, DS18B20, Float Sensor, Float Switch, indoor aquaponics, Internet-of-Farming, IoT aquaponics, One-wire, Rj45 connector, Slide Switch, Stainless Steel Temp Probe, SUGRU.Tags: 1-wire, aquaponic automation, Controlled Environment Agriculture, DIY aquaponics, DS18B20, indoor aquaponics, rik kretzinger, Temp Probe, Temperature Probe
add a comment
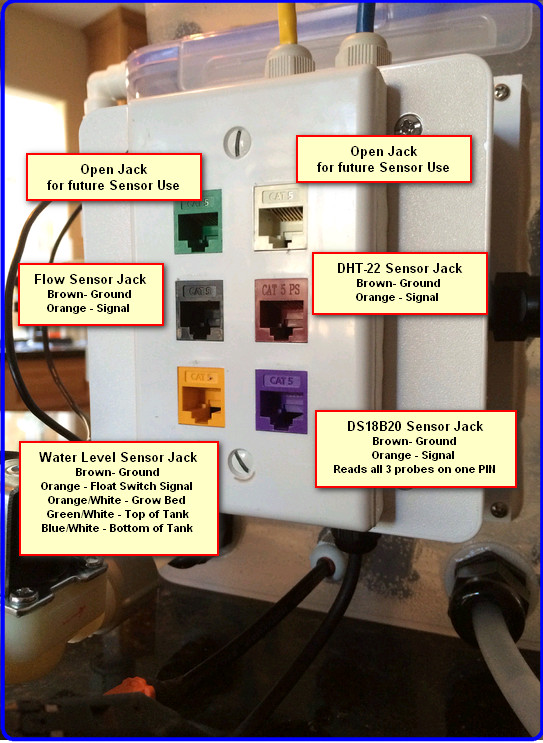
A big part of the aquaponic simulator is the fact that it uses standard RJ-45 jacks to interface with Arduino’s or a Raspberry PI. Having this type setup helps keep all the wires and connectors that are required for the unit to operate in a consistent manor safe and out of possible interaction with water elements.
Here is what is needed to construct this sub-assembly:

When all the above parts come together the finished product looks like this:
Re-Design of agponic-MD January 29, 2014
Posted by rik94566 in agponic MD, agponicMD, agponics.com, aquaponic automation, aquaponics, aquaponics electronics, DS18B20, Float Sensor, Float Switch, indoor aquaponics, IoT aquaponics, One-wire.Tags: aquaponic automation, aquaponics, automation, CAT 5 cable, Controlled Environment Agriculture, DIY aquaponics, indoor aquaponics, microcontroller, rik kretzinger
2 comments
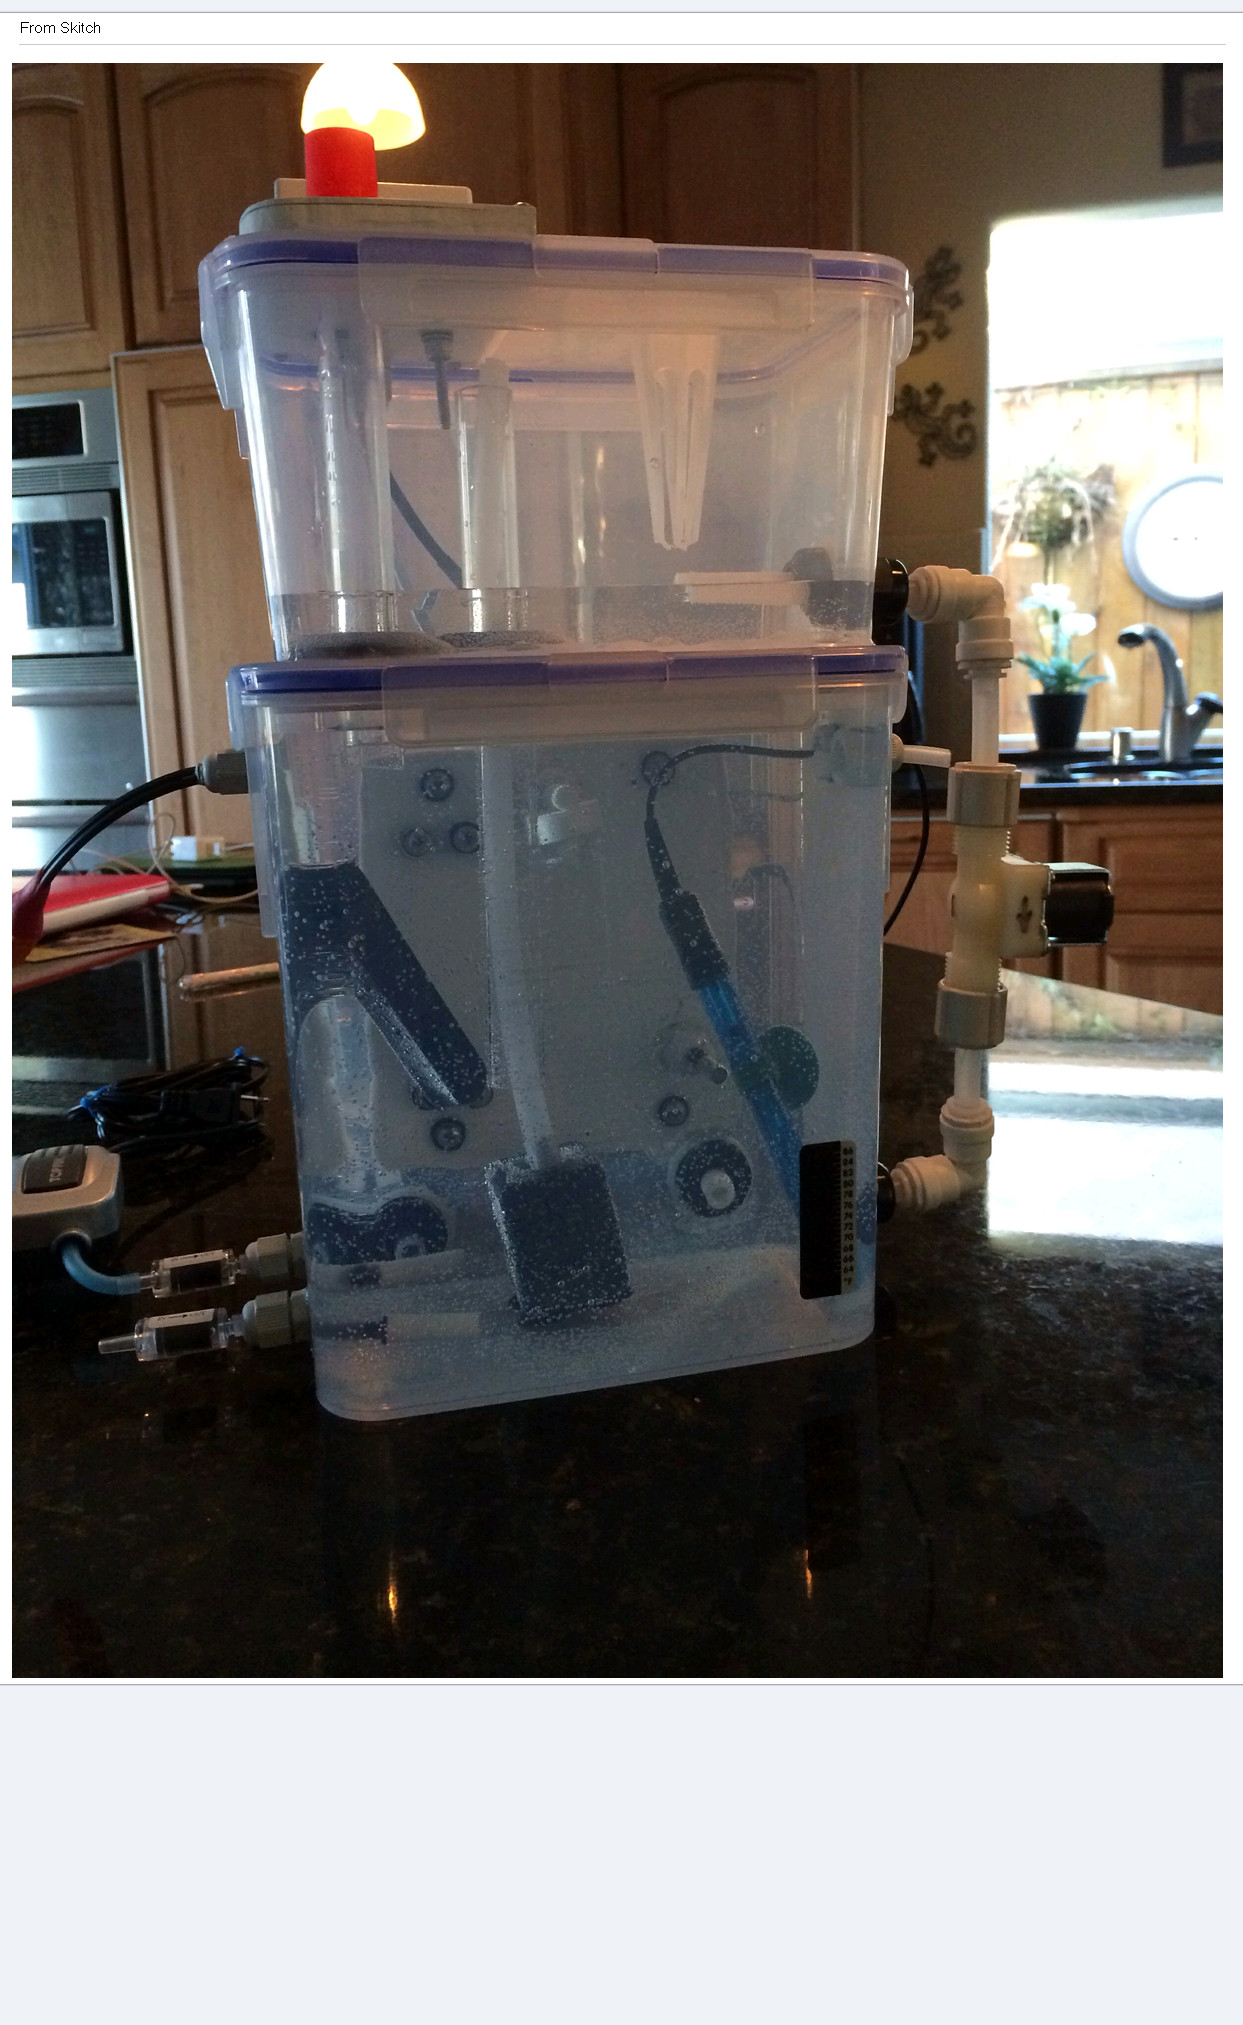 After much thinking about how I could improve the desktop aquaponic automation simulator called agponic-MD (micro-device) I built a new one. It helps to have people that wanted to purchase a few of them. So I got busy and made it a bit larger with expansion capability for future components like a 12V backup system and additional sensors to learn how to automate. Here is the feature set for the re-designed agponic-MD.
Fully valved for water movement and control
Large grow bed and tank configuration
4 – water level control sensors
1 – RH and temp internal probe
3 – temp probes (grow bed / water tank / outside)
1 – water flow sensor
1 – pH probe and connectors
1 – DO or additional probe expansion options for future growth of unit
1 – controllable drain port
1 – grow bed media package to fit grow bed (comes from an established grow bed – so bacteria included)
1 – Container of starter water from an active system ( should you like to cycle the system)
1 – outside tank temp indicator
1 – Heater for tank water
1 – Air pump and stone
Over flow configuration to prevent spillage in grow bed

What is an aquaponic device for IoT-aquaponics June 11, 2013
Posted by rik94566 in agponics.com, aquaponic automation, DIY aquaponics, DS18B20, Float Switch, IoT aquaponics, One-wire.Tags: aquaponic automation, aquaponics, DIY aquaponics, DS18B20, IoT, microcontroller, rik kretzinger, Temperature Probe
2 comments
Aquaponic devices can come in many sizes and shapes. There are simple and complex devices as with all technologies.
The most simple aquaponic device would be a temp probe connected up to an Arduino with the data generated being sent out to a Cloud service like Xively/Cosm/Pachube or ThingSpeak via ethernet or wireless connection.
I am working on a more complex aquaponic device right now that will contain the following sensor set:
pH sensor
3 – DS18B20 probes
1 – Flow meter
3 – media sensors
1 – Float Switch
1 – Humidity and Temp probe (DHT-22)
3 – gravity feed valves controlled by relays
1 – air pump controlled by relay (in N/O) configuration
1 – back-up air pump that turns on if electric goes out
1 – heater controlled by relays driven by temp reading being generated by the DS18B20 probes.
This device will be my proto-type to test sensor configurations and try new sensors out. It will allow me to gain an understanding of how all this IoT technology comes together and can actually perform work with out me having to constantly watch my system. I would like to be in Hawaii and just have my iPhone alert me when an event is out of range. Then I could make the necessary adjustments over my Aquaponic API software and be done with it while at the beach.
10,000 views surpassed on Instructables June 11, 2011
Posted by rik94566 in aquaponic automation, aquaponics, arduino, CAT 5 Cable, Crop, DIY aquaponics, DS18B20, Float Sensor, Float Switch, general, Glow Panel 45, Gravity feed valves, Hacks, indoor aquaponics, indoor gardens, indoor growing, Instructables, LED growing, LED lights, plumbing, POW-Rduino, Rj45 connector, sensor, Sensor Hub, Stainless Steel Temp Probe, Standards, sunshine systems, Suppliers, Temperature Probe, Yield Results.Tags: aquaponic automation, aquaponics, arduino, arduino sketch, CAT 5 cable, DIY aquaponics, DS18B20, electronics, float sensor, hacks, indoor aquaponics, indoors aquaponics, microcontroller, rik kretzinger, sensor, Temp Probe, Temperature Probe
1 comment so far
I have written 3 instructables over the last 2 years. I have just gone over 10,000 views. Never thought I would every have had that many views with only 3 instructions. Always good to know people are interested in what I am interested in.

Passed 10,000 views
SUGRU – fills in the holes June 7, 2011
Posted by rik94566 in aquaponic automation, aquaponics, CAT 5 Cable, DIY aquaponics, DS18B20, Float Sensor, Float Switch, Hacks, Home Depot, indoor aquaponics, indoor gardens, indoor growing, Rj45 connector, sensor, Sensor Hub, Stainless Steel Temp Probe, Standards, SUGRU, Suppliers, Temperature Probe.Tags: aquaponic automation, aquaponics, arduino, automation, CAT 5 cable, DIY aquaponics, DS18B20, electronics, float sensor, float switch, hacks, indoor aquaponics, indoors aquaponics, microcontroller, rik kretzinger, sensor, Temp Probe, Temperature Probe
1 comment so far
Now that I have working Sensors on a standardized connection platform (CAT 5 & RJ45). I need to figure out how to use off the shelf housings that will be plug-n-play for my aquaponic units. The problem is that nothing is water resistant and they all have lots of openings. That is because most if not all are for indoor use. All the outdoor options are to large for my applications. So I went with a standard indoor 2-Port QuickPort I purchased at Home Depot.

Leviton 2-Port Surface Mount Housing
With a little help from SUGRU I was able to fill in the holes and can now mount the completed unit on my aquatubes. This will allow me to cover all my sensor connections and transition over to RJ45 connectors.
Here is what I started with:

Starting Housing
Here is what it looked like before assembly:

Openings filled before assembly - Inside look

Bottom View
Here is the completed assembly:

Back View of Completed Assembly

Front View of Completed Assembly
How the openings match-up:

Opening that match-up
Now I am ready to connect up the sensors and mount the completed assembly on the aquatubes hook-up my CAT 5 and I am ready to sense all inputs. O yes, I need some White SUGRU to make it look better. I am placing my order today!
RJ45 Sensor Hub June 7, 2011
Posted by rik94566 in aquaponic automation, aquaponics, arduino, CAT 5 Cable, DIY aquaponics, DS18B20, Float Switch, Hacks, indoor aquaponics, indoor gardens, indoor growing, sensor, Sensor Hub, Standards, Temperature Probe.Tags: aquaponic automation, aquaponics, arduino, arduino sketch, automation, CAT 5 cable, DIY aquaponics, DS18B20, electronics, float sensor, float switch, gravity feed valves, hacks, indoor aquaponics, indoor growing duckweed, indoors aquaponics, microcontroller, rik kretzinger, sensor, Temp Probe, Temperature Probe
2 comments
Now that I have established my standard for sensor connections I will need build the hub to hook up the sensors. So I build a 2 connector RJ45 jack hub to test the sensors that I build. This hub will allow me to test different sensor configurations and arduino sketches for test sensors as I develop them.
Here is what it looks like.

RJ45 Sensor Hub Connector

End view of terminals
I have marked the terminals on both ends so there can be no confusion as to what connections are being used. Make sure you have test all the connections with your multimeter. That way you know for sure everything is working before you start testing situations with sensors.
Float Switch — values returned August 24, 2010
Posted by rik94566 in aquaponics, arduino, Float Switch.Tags: aquaponics, float switch, rik kretzinger
add a comment
Knowing the values returned from the switch makes it possible to write a Sketch using these values to accomplish the task of turning a pump on or off. Being that this is a switch only two states occur. ON or OFF. We will now determine the values for the ON State and the OFF State.
Three things need to happen in order to generate values from the Float Switch.
1. Arduino Sketch needs to be developed and load on to the arduino
2 Reading taken in the OFF state or bottom of the switch.
3. Reading taken in the ON state or top of the switch.
ARDUINO SKETCH DEVELOPED:

Sketch to test for values
// Sketch to determine values for FLOAT SWITCH
int FLOAT = 0;
int float_val;
void setup(){
Serial.begin(9600); // open serial port
}
void loop() {
float_val = analogRead(FLOAT); // read value from FLOAT switch
Serial.print(“Float Switch reads “);
Serial.println(float_val);
delay(5000);
}
Reading from the lowest level of the Float Switch:

Lowest leavel reading
Reading from the higest level of the Float Switch:

High level reading
We now know the values in the ON and OFF States of the Float Switch.
It is now possible to use this switch to control water levels and perform work functions.
