ASPARAGUS – year 2 March 1, 2014
Posted by rik94566 in agponics.com, aquaponic automation, aquaponics, asparagus, Crop, DIY aquaponics, IoT aquaponics.Tags: aquaponic automation, aquaponic crop, DIY aquaponics, indoor aquaponics, microcontroller, rik kretzinger, sensor
add a comment
Well I am into year 2 with my asparagus. The weather in Northern California has been short on rain and very warm. So no surprise that my asparagus is about 2 months ahead of normal. I was thinking that it would be about a month earl as I can control almost all the environmental factors that impact the growth cycle. Just so happy to see that it survived the winter and growing well. You judge for yourself!


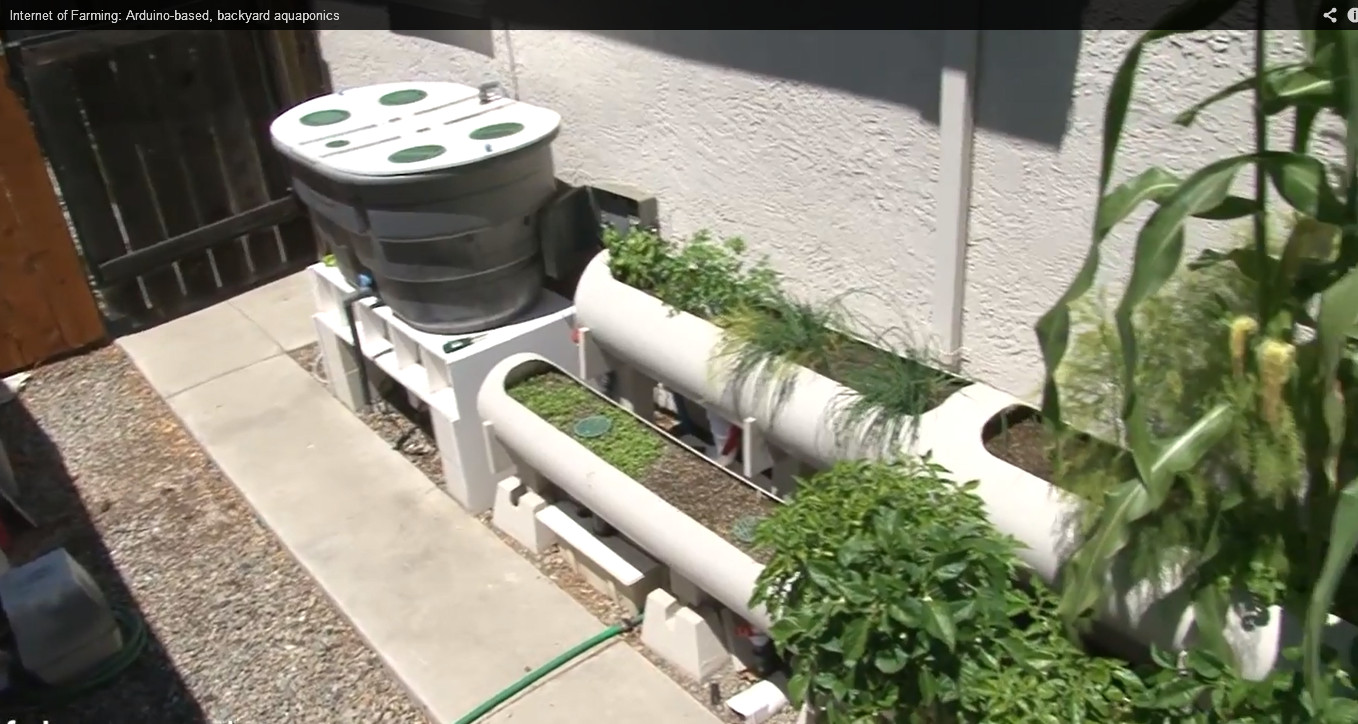
200,000 Views on Youtube – “Internet of Farming” — WOW February 2, 2014
Posted by rik94566 in agponics.com, aquaponic automation, aquaponics, Crop, DIY aquaponics, Internet-of-Farming, IoT aquaponics, Tower System.Tags: aquaponic crop, automation, Controlled Environment Agriculture, DIY aquaponics, indoor aquaponics, IoT, LED aquaponics, microcontroller, rik kretzinger, Temp Probe, Temperature Probe
add a comment

INDOOR GARDEN SHOW – SF September 11, 2013
Posted by rik94566 in agponics.com, Air Pots, Crop, DIY aquaponics, indoor gardens, indoor growing, PRODUCTS.Tags: aquaponic automation, automation, Controlled Environment Agriculture, DIY aquaponics, rik kretzinger
add a comment
This past July I was able to attend the Indoor Garden Show in San Francisco.
Have always wanted to attend for the past 3 or 4 years, but was unable due to my personal vacation during the same time.
Well this year it worked out and got to spend a whole day there with a large number of others.
Found some very interesting new items that I will be able to put to work on some up coming projects. I will blog about them as I have time.
The one that was of most interest are Air Pots. This is a product that will have major impact for me going forward. I will be blogging about it and how I am using it in the next few posts. So stay tuned.

Habaneros — gone wild September 4, 2013
Posted by rik94566 in Crop, Habanero.2 comments
I do not eat habaneros, but my son and daughter in law do. So they wanted me to grow some for them. So this spring it planted 3. As this is my first time growing them I had no idea how much they can produce in an aquaponics system like mine. I had so many and they are so hot none of my friends will take any more.


Internet-of-Farming July 5, 2013
Posted by rik94566 in agponics.com, aquaponic automation, aquaponics electronics, arduino, Cilantro, DIY aquaponics, IoT aquaponics.Tags: aquaponic automation, arduino, DIY aquaponics, float sensor, indoor aquaponics, IoT, rik kretzinger, Temperature Probe
15 comments
Just got featured on an international blog showing my aquaponic system and work I have been doing with aquaponic automation in ag related technologies. Getting close to 10,000 views on YouTube.
Asparagus – new crop for this year February 23, 2013
Posted by rik94566 in agponics.com, aquaponics, asparagus, DIY aquaponics, Yield Results.Tags: aqauponic asparagus, aquaponic automation, asparagus aquaponics, DIY aquaponics, rik kretzinger
4 comments
I wanted to try a new crop this year. So I did some research for my area and picked a crop that I had some interest in for quite some time, but had no idea how to grow it. Then to try and grow it using aquaponic method is really out there as a concept. Doing a internet search there is very little to no information on the subject of growing asparagus in an aquaponics system.
So here we go with my first attempt at growing Asparagus in my 100 gallon unit.
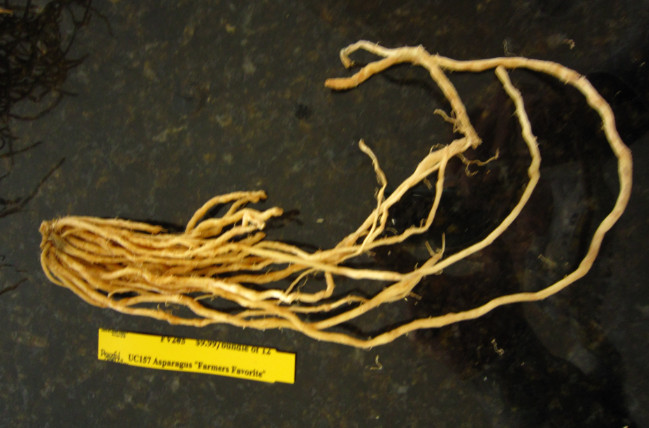
Asparagus Start
I placed an order for my starts in early October so I was assured of getting my plant material by Mid-January. I had no idea of what the weather would be like in Mid-January, but I took my changes on getting the starts. There was a chance that if I ordered to close to the actual shipping time from the company I would not get the plant starts I needed to launch this new growing adventure, as the company does run out of asparagus early in the season.
The next big issue was how should I plant them in my grow beds. I learned that asparagus is planted 12 to 15 inches below ground in late January to early spring, so my timing was good but needed to empty my aquatubes to be enough depth for the starts. Once the grow tubes were empty I covered the bottom of the grow bed with enough gravel to make sure the starts would not be sitting in standing water when the grow beds drain after each watering cycle. This is because to fully drain out of my grow beds there is always some water that sits at the bottom of the grow beds and will drain out over longer period of time.

Placement on gravel

Spaced out in growbed
Once I had all my starts place in the grow beds I covered them in gravel up to the crowns. Then I put a very thin layer of gravel over the crowns.

Gravel up to crowns
In my research I found that when planting asparagus – you place the starts and cover them lightly and once they start and throw shoots you cover them a little bit, just enough to support the sprouts until they reach ground level or in my case the top of my gravel beds.
Next was to give them some water so I could bring the starts out of dormancy. I did not want to over water them and cause disease problems so I watered them once ever other day. Temperatures had been down in the low 30’s with day time temps only getting up high 40’s.
After one week I had my first shoots.
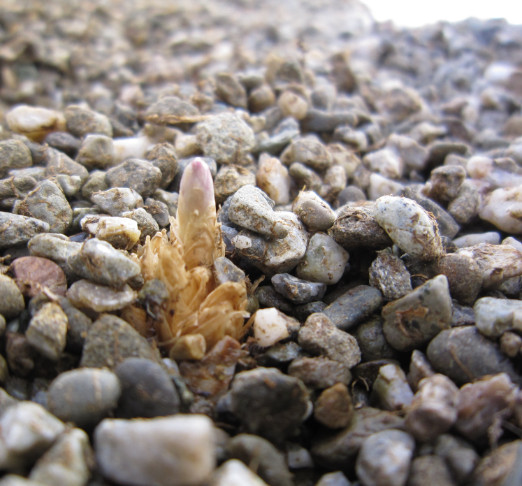
First Shoot
ATOMIC RED — (daucus carota) – aquaponic carrots April 23, 2012
Posted by rik94566 in aquaponics, Atomic Red Carrots, Carrots, Kitazawa Seed Company.Tags: aquaponic crop, aquaponics, carrots, DIY aquaponics, rik kretzinger
add a comment
At the first of the new year I had open bed space and a packet of Atomic Red Carrots from Kitazawa Seeds. So guess what — I thought I would give them a try.

ATOMIC RED CARROTS
When I looked at the expected growth characteristics I was a little early on the germination range and the height would be about 2 feet in total. I use a whole package of seed and just mixed into my gravel – nothing special here. The seeds are very – very – very tiny. They did float at first and ended up on one end of the bed area. Once germination was accomplished I just moved the seedlings around until I got the spacing I thought would work. Having never worked with carrots before I had no idea what to expect.
Well as of this past weekend here is what I have:

Over 3 feet of growth now
Here are additional pictures to show how well these “ATOMIC REDS” are doing.

Full view of the grow bed

Additional view
Akasanjaku – Yard Long Bean February 19, 2012
Posted by rik94566 in Akasanjaku, aquaponics, Kitazawa Seed Company, Yard Long Bean.Tags: Akasanjaku, aquaponic crop, DIY aquaponics, Kitazawa Seed, rik kretzinger, Yard Long Bean
add a comment
Akasanjaku
Vigna unguiculata subsp sesquipedalis

Akasanjaku
| Seed #174 |
- Warm season annual
- Approx. 50-60 seeds in packet. (A seed will vary in weight and size within a given seed lot. The number of seeds stated is only an estimate.)
- Maturity: Approx. 75 days
- Planting season: Late spring to early summer
Load them up — 5 (DS18B20) Temp Probes — SKETCH CRASHES September 10, 2011
Posted by rik94566 in aquaponic automation, aquaponics, arduino, CAT 5 Cable, CEA, Controlled Environment Agriculture, Crop, DIY aquaponics, DS18B20, indoor aquaponics, indoor gardens, indoor growing, Sensor Hub, Stainless Steel Temp Probe, Temperature Probe.Tags: aquaponic automation, aquaponics, arduino, arduino sketch, automation, CAT 5 cable, DIY aquaponics, DS18B20, indoor aquaponics, indoors aquaponics, microcontroller, Miles Burton, rik kretzinger, sensor, Temp Probe, Temperature Probe
2 comments
Well I got it together now and fired everything up — and the sketch crashed… Here are the details of what it looked like.

5 probes and connection through harness
I put the 5 probe sketch I was using up on google docs and made it available at this link:
If you have a problem with the sketch just email me at rik94566@gmail.com and I will send the sketch to you.
Here is what it looks like as it was coded:

5 probe sketch as it ran
Here is the result when I ran the sketch:

Sketch only went this far
Interesting thing is that I worked my way up from 1 probe to 5 probes. Before I started I checked all slots on the harness to make sure there would be no problems with the connections. Everything worked fine through 4 probes. Here is what it looked like running 4 probes.
Now the fun begins.. get to figure out why this does not work with 5 probes. Found out some other things about deviceIndex while I was loading up all the probes. Will blog about that next and present concepts that help drive the One-wire protocols.
RED CABBAGE AND APPLE SLAW August 20, 2011
Posted by rik94566 in aquaponics, Crop, DIY aquaponics, indoor aquaponics, indoor gardens, indoor growing, Red Cabbage.Tags: aquaponic automation, aquaponic crop, aquaponics, DIY aquaponics, indoor aquaponics, red cabbage, red cabbage aquaponics, rik kretzinger, yield results
1 comment so far

Father's Day Red Cabbage meal
Now that the red cabbage had been harvested needed to something with it. What better than to make a dish for Father’s Day. It was good and with all the red cabbage I had, it last for quite sometime. The leftovers went to the worms and Black Soldier Fly.
Here is the recipe we used if you are interested:
Read more about it at www.cooks.com/rec/view/0,191,147161-245206,00.html
Content Copyright © 2011 Cooks.com – All rights reserved.
1/2 c. mayonnaise
1/4 c. plain yogurt
1 tbsp. sugar
2 tbsp. white vinegar
1 tsp. salt
1 tsp. celery seeds
1 tsp. Dijon-style mustard
Dash of white pepper
1 sm. head red cabbage, finely shredded
2 med.-sized tart green apples, cored, thinly sliced
1/3 c. finely chopped parsley
Lettuce or romaine leaves
Smoothly mix mayonnaise, yogurt, sugar, vinegar, salt, celery seeds, mustard and pepper. Lightly mix cabbage, apples, and parsley in a large bowl. Fold in dressing until well combined. Chill 1 hour or longer to blend flavors. Serve in a bowl lined with lettuce or romaine leaves. 4 servings.For 2 servings, half of the ingredients. For 8 servings, double the ingredients, but use 1 large head of red cabbage.TIPS: For best flavor, prepare this salad at least 1 hour before you plan to serve it, then chill to blend flavors. If you wish, the salad can be made the night before serving.
