Pass through PORT – on agponic-MD February 3, 2014
Posted by rik94566 in agponic MD, agponicMD, agponics.com, aquaponic automation, aquaponics, aquaponics electronics, DIY aquaponics, indoor aquaponics, Internet-of-Farming, IoT aquaponics, Rj45 connector.Tags: aquaponic automation, aquaponics, Controlled Environment Agriculture, DIY aquaponics, indoor aquaponics, rik kretzinger, sensor
add a comment
One design feature on the agponicMD unit is the “pass through port”.
This is a tube that runs from the top of the grow bed and in front of the RJ-45 top junction connection box and then down into water tank or fish tank.

This ‘Pass through port” actually has 3 functions:
First Function — is to allow the unit water tank or fish tank (if you have fish in it) to be filled with having to open the unit up.
Second Function — allow for your fish to be feed if you chose to add fish to the unit. I like Cory cats myself in it Green Emerald’s add a nice color contrast .
Third Function — Really the main reason I needed one. Being that these containers are sealed when fully locked down air cannot get into the bottom tank. This causes a problem with the drain valve. Water tank container will not allow draining from the grow bed container as a air is source needed to unlock the inside pressure of the closed container.
I did a youtube video on the subject. http://www.youtube.com/watch?v=odFwA7KqAJ0

Connector Box on agponic-MD February 2, 2014
Posted by rik94566 in 1-wire, agponic MD, agponicMD, agponics.com, aquaponic automation, aquaponics, aquaponics electronics, arduino, DIY aquaponics, DS18B20, Float Sensor, Float Switch, indoor aquaponics, Internet-of-Farming, IoT aquaponics, One-wire, Rj45 connector, Slide Switch, Stainless Steel Temp Probe, SUGRU.Tags: 1-wire, aquaponic automation, Controlled Environment Agriculture, DIY aquaponics, DS18B20, indoor aquaponics, rik kretzinger, Temp Probe, Temperature Probe
add a comment
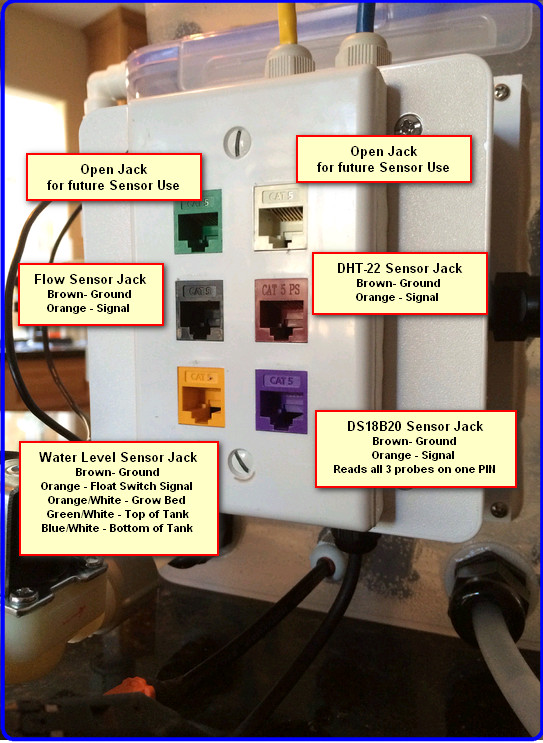
A big part of the aquaponic simulator is the fact that it uses standard RJ-45 jacks to interface with Arduino’s or a Raspberry PI. Having this type setup helps keep all the wires and connectors that are required for the unit to operate in a consistent manor safe and out of possible interaction with water elements.
Here is what is needed to construct this sub-assembly:

When all the above parts come together the finished product looks like this:
NASA Standard – good enough for me March 7, 2013
Posted by rik94566 in agponics.com, DIY aquaponics, indoor aquaponics, Rj45 connector, Standards, Uncategorized.Tags: aquaponic automation, aquaponics, arduino sketch, DIY aquaponics, rik kretzinger
add a comment
I was reading through my blog feeds and ran on to this item:

HERE IS THE LINK IF INTRESTED:
http://blog.makezine.com/2012/02/28/how-to-splice-wire-to-nasa-standards/
I have been interested in establishing standards in all the things that I work on because when I start to scale I will need to have documented processes in place that will allow for building SOP (Standard Operation Procedures). An aquaponics business is no different than other well established industries. So now I have one for all my wire connections that are well documented and well established.
PRINTED — 3D part now printed and ready to use February 21, 2013
Posted by rik94566 in aquaponics, arduino, Rj45 connector, Sketch-UP.Tags: 3D, 3D printing, aquaponic automation, aquaponics, DIY aquaponics, rik kretzinger
4 comments
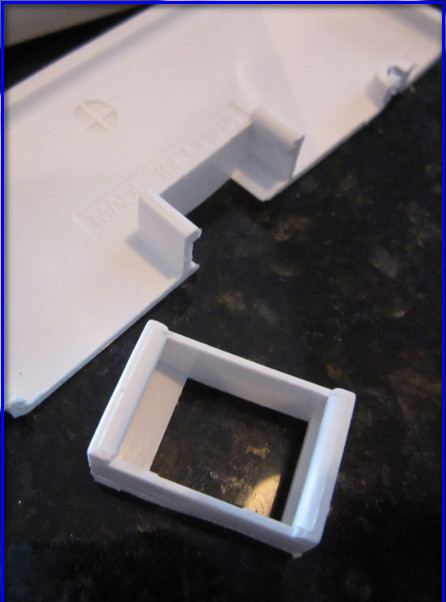
Well it has been a journey to print my first 3D item. Here it is.

Front View of RJ-45 Socket
Here is a view of printed socket with parts that will actually be use in the final product and compared to my proto-type.

Printed part next to prototype
Here is the actual cost break-down on the printing:

Printing costs
Now for the killer: SHIPPING —-
The item was shipped from Oakland, CA to where I live only about 35 miles and went out UPS. The thing weighs less than an oz or two!

Total came to $20.45. At this rate the cost of a 3D printer is well within reach in the near future. With all the things I want to create and print I can keep a 3D printer busy most of every day.
SCALE-UP TIME — this solves the to small to print RJ-45 socket problem February 12, 2013
Posted by rik94566 in aquaponic automation, aquaponics, Rj45 connector, Sketch-UP.Tags: aquaponic automation, DIY aquaponics, rik kretzinger
add a comment
Now I have a single unit RJ-45 socket cleaned up and water tight. So now I needed to deal with the issue of my single model being to small to print. Since I actually needed a 4 segment for my finished assembly that fits on my arduino case. Here is the finished single model.

I started with the single unit and added one additional unit at a time. I got all the alinements correct on each level before moving on to the next addition of another unit to the scale up. Here is the total scale up and ready for printing. The finished model is 25mm X 68mm.

WATER TIGHT model — Sketch-UP plug-in needed February 3, 2013
Posted by rik94566 in agponics.com, CEA, DIY aquaponics, Rj45 connector, Sketch-UP, Standards.Tags: aquaponic automation, DIY aquaponics, indoor aquaponics, rik kretzinger, sensor
add a comment
With a little research on my end I found the Sketch-Up plug-in that had very good help features. The product is CADspan.

You can down load it here if you have a need for this type of product: http://www.cadspan.com/tools
Here is a YouTube to help you visualize what is possible with this technology:
THINGS IN COMMON — 3D Printing and Aquaponics January 28, 2013
Posted by rik94566 in aquaponics, DIY aquaponics, Rj45 connector, Uncategorized.Tags: aquaponic automation, CAT 5 cable, microcontroller, rik kretzinger
add a comment
Well as it turns out 3D printing and aquaponics do have something in common.
They both need to be water -tight!

Now that I have a Sketch-up model I wanted to get it printed.
I figured out that I have basically 3 options to get this done.
Option One –Buy a 3D printer. I did some research on this and know what I want am ready to go, until I ran the idea by my wife! The unit I wanted costs in the $700.00 range. As on all my projects and ventures my wife has final say so on all things financial. This one did not get approved. Not to say that it won’t happen in the future, but just not right now.
Option Two – Use one of the current leaders in the on-line printing services business. The two leaders that I know of are Shapeways and Ponoko. The other choice here is to go to a TechShop and have them print my model for me.
Option Three – Find someone with a 3d printer and have them make a print for me. I would of course pay them for this service.
Well option one is a no go situation for the present time. Option three will not work, as I do not know anyone well enough to inquire about having them make a print for me.
So Option Two it is.
The TechShop choice is much harder for me as I would have to show up at one of their locations in the bay area with file in hand and then get all signed in to talk with someone about how the whole process works within their structure. Way to much work for a little part.
So I went with Shapways and Ponoko. I signed up and was ready to go, almost…. Well as in all things technical there is a file incompatibility problem with using Sketch-Up and 3D printing together. I now needed to convert my model to a .STL format. I did my research and got a free version of a product that claimed the conversion was easy to do. I did the conversion and loaded my model up to be priced and approved.
Well again I hit an issue. As it happens my model is not “Water-tight” and has to many holes and the model is to small to print on either of the services. I could see no holes in my model and did not understand how to fix this problem. As in all things internet I started on my quest to accomplish my goal of getting a model printed. Now I found myself researching and learning how to make a model water-tight. It is a fun adventure and learned a lot that will be very useful in future designs with Sketch-up
Frist RJ-45 socket model with Sketch-UP January 20, 2013
Posted by rik94566 in aquaponic automation, Rj45 connector, Sketch-UP.Tags: aquaponic automation, DIY aquaponics, indoor aquaponics, rik kretzinger
add a comment
Here is the model that I developed after a lot of learning and redoing over and over again until I got to this point. I feel good enough with this model to start looking at getting it ready for 3-D printing.

Sketch-UP model
I did a YouTube video to give a feel for what the model looks like and some of the neat features Sketch-UP has that is fun to use and needed to develop models.
NEW TOOL NEEDED — digital caliper January 16, 2013
Posted by rik94566 in aquaponics, DIY aquaponics, Harbor-Freight, Rj45 connector.Tags: aquaponic automation, DIY aquaponics, rik kretzinger
add a comment

Harbor-Freight – Digital Caliper
Now that I have a model to work with I needed a way to pull measurements off. Not being an engineer of any kind or worked with very small models, I never had a need to own a digital caliper. As you can see it was not an issue of cost. Everyone should own one of these tools they are so handy for a number of different jobs. Here is the one I purchased. Now I was all set to jump off into the deep end and start learning Sketch-Up. It was a sink or swim venture for me….. and my starting project was way more complicated than the run of the mill dog house construction.
Here is the link if you want to look at it:
http://www.harborfreight.com/6-inch-digital-caliper-47257.html
RJ-45 Jack insert development using Sketch-Up January 12, 2013
Posted by rik94566 in aquaponic automation, aquaponics, arduino, DIY aquaponics, Rj45 connector.Tags: aquaponic automation, CAT 5 cable, DIY aquaponics, rik kretzinger
add a comment
Being that I have gone with RJ-45 jacks as a standard for all my aquaponics systems I need a way to connect everything together. The problem I was having is that all the jack insert plates are standard switch plate or phone jack block mounting units and hard to fit into some automation designs. So I built a prototype of what I wanted out of materials I had laying around my shop. It is very rough and not the finished product I was looking for.

RJ-45 Jack head on arduino case
This prototype gave me a good idea of what I needed to make this work and is a good starting platform for future cases to work with my systems that I have on the drawing board. I had been looking for a project to help me learn Sketch-Up. Sketch-up is a 3-D drawing program to do design work with and allows models developed to be printed on 3-D printers. So here I go to make this happen. I am not going to go into all the steps needed on how to install or use Sketch-Up here (you will need to figure this out on your own).
So the most basic element of the project is the individual RJ-45 insert jack. Next step was to get a visual of what this would look like in the real world. I need to visualize my projects before I can build them. The first step was to figure out how I could get a handle on a working model. I started with a single RJ-45 switch plate and moved forward from there. All of this I purchased at Home Depot.
A Starting Point for visual model
This now gave me a working model that I could pull measurements from. This proved to be harder than I thought and has taken me well over 6 months to get working. I have had many starts and stops when I have hit learning curve deficits. In other words me lacking the Sketch-Up skills to pull this project off. I have done a lot of work with VISIO in the past. But, when you jump from a 2-D drawing tools to 3-D drawing programs the learning curve is steep and well worth the effort as you will see in future posts. At least I think so.

Cut away view of the jack insert socket

Visual of the size I am working with for this model
